
Page 624 - Demo
P. 624
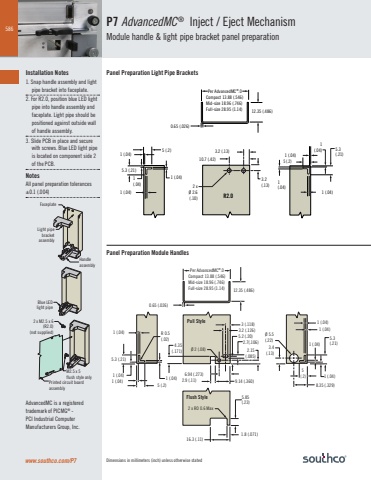
586Dimensions in millimeters (inch) unless otherwise statedP7 AdvancedMC® Inject / Eject MechanismModule handle & light pipe bracket panel preparation12.35 (.486)0.65 (.026)Compact 13.88 (.546)Mid-size 18.96 (.746)Full-size 28.95 (1.14)Per AdvancedMC®.01(.04)1 (.04)1 (.04)5.3(.21)5 (.2)1 (.04)1 (.04)1 (.04)1(.04)5.3 (.21)5 (.2)1 (.04) 3.2 (.13)10.7 (.42)2 xØ 2.6(.10)3.2(.13)R2.0FaceplateBlue LEDlight pipeHandle assemblyLight pipebracketassemblyPrinted circuit board assembly2 x M2.5 x 6(R2.0)(not supplied)M2.5 x 5 flush style onlywww.southco.com/P7Ø 5.5(.22)1 (.04)1 (.04)1 (.04)1 (.04)5.3(.21)5 (.2)3.4(.13) Ø 2 (.08) 4.35(.171) 2.15 (.085)6.94 (.273)2.9 (.11) 9.14 (.360)1 (.04)1 (.04) 1 (.04)1 (.04)5.3 (.21)5 (.2)12.35 (.486)0.65 (.026)Compact 13.88 (.546)Mid-size 18.96 (.746)Full-size 28.95 (1.14)Per AdvancedMC®.08.35 (.329)5.2 (.20)2.7(.106)3 (.118)R 0.5(.02)3.2 (.126)1.8 (.071)16.3 (.11)5.85 (.23)2 x RO 0.6 MaxFlush StylePull StyleFaceplateBlue LEDlight pipeHandle assemblyLight pipebracketassemblyPrinted circuit board assembly2 x M2.5 x 6(R2.0)(not supplied)M2.5 x 5 flush style onlyInstallation Notes1. Snap handle assembly and light pipe bracket into faceplate.2. For R2.0, position blue LED light pipe into handle assembly and faceplate. Light pipe should be positioned against outside wall of handle assembly.3. Slide PCB in place and secure with screws. Blue LED light pipe is located on component side 2 of the PCB.NotesAll panel preparation tolerances ±0.1 (.004)Panel Preparation Light Pipe BracketsPanel Preparation Module HandlesAdvancedMC is a registered trademark of PICMG® - PCI Industrial Computer Manufacturers Group, Inc.
