
Page 697 - Demo
P. 697
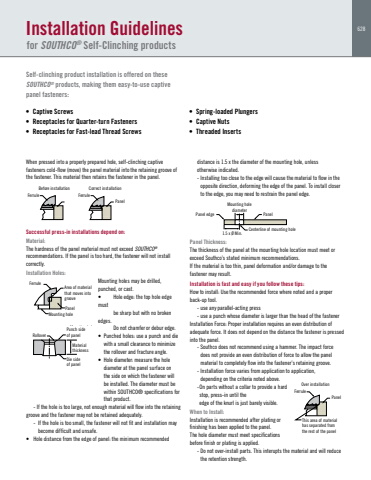
628 Installation Guidelinesfor SOUTHCO%u00ae Self-Clinching productsSelf-clinching product installation is offered on these SOUTHCO%u00ae products, making them easy-to-use captive panel fasteners:When pressed into a properly prepared hole, self-clinching captive fasteners cold-flow (move) the panel material into the retaining groove of the fastener. This material then retains the fastener in the panel. Panel edgeBefore installation Correct installation Over installationMounting holediameterPanel1.5 x %u00d8 Min. Centerline of mounting holeFerrule RolloverFerrule Ferrule FerrulePanelPanelArea of materialthat moves intogrooveMounting holeDie sideof panelMaterialthicknessPunch sideof panelPanelThis area of material has separated from the rest of the panel Successful press-in installations depend on:Material:The hardness of the panel material must not exceed SOUTHCO%u00aerecommendations. If the panel is too hard, the fastener will not install correctly.Installation Holes:Mounting holes may be drilled, punched, or cast. %u2022 Hole edge: the top hole edge must be sharp but with no broken edges. Do not chamfer or debur edge.%u2022 Punched holes: use a punch and die with a small clearance to minimize the rollover and fracture angle.%u2022 Hole diameter: measure the hole diameter at the panel surface on the side on which the fastener will be installed. The diameter must be within SOUTHCO%u00ae specifications for that product.- If the hole is too large, not enough material will flow into the retaining groove and the fastener may not be retained adequately. - If the hole is too small, the fastener will not fit and installation may become difficult and unsafe. %u2022 Hole distance from the edge of panel: the minimum recommended %u2022 Captive Screws %u2022 Receptacles for Quarter-turn Fasteners%u2022 Receptacles for Fast-lead Thread Screws %u2022 Spring-loaded Plungers %u2022 Captive Nuts%u2022 Threaded Insertsdistance is 1.5 x the diameter of the mounting hole, unless otherwise indicated.- Installing too close to the edge will cause the material to flow in the opposite direction, deforming the edge of the panel. To install closer to the edge, you may need to restrain the panel edge.Panel edgeBefore installation Correct installation Over installationMounting holediameterPanel1.5 x %u00d8 Min. Centerline of mounting holeFerrule RolloverFerrule Ferrule FerrulePanelPanelArea of materialthat moves intogrooveMounting holeDie sideof panelMaterialthicknessPunch sideof panelPanelThis area of material has separated from the rest of the panelPanel Thickness:The thickness of the panel at the mounting hole location must meet or exceed Southco%u2019s stated minimum recommendations. If the material is too thin, panel deformation and/or damage to the fastener may result.Installation is fast and easy if you follow these tips:How to install: Use the recommended force where noted and a proper back-up tool. - use any parallel-acting press- use a punch whose diameter is larger than the head of the fastenerInstallation Force: Proper installation requires an even distribution of adequate force. It does not depend on the distance the fastener is pressed into the panel.- Southco does not recommend using a hammer. The impact force does not provide an even distribution of force to allow the panel material to completely flow into the fastener%u2019s retaining groove.- Installation force varies from application to application,depending on the criteria noted above.-On parts without a collar to provide a hard stop, press-in until the edge of the knurl is just barely visible.When to Install:Installation is recommended after plating or finishing has been applied to the panel. The hole diameter must meet specifications before finish or plating is applied.- Do not over-install parts. This interupts the material and will reduce the retention strength.Panel edgeBefore installation Correct installation Over installationMounting holediameterPanel1.5 x %u00d8 Min. Centerline of mounting holeFerrule RolloverFerrule Ferrule FerrulePanelPanelArea of materialthat moves intogrooveMounting holeDie sideof panelMaterialthicknessPunch sideof panelPanelThis area of material has separated from the rest of the panelPanel edgeBefore installation Correct installation Over installationMounting holediameterPanel1.5 x %u00d8 Min. Centerline of mounting holeFerrule RolloverFerrule Ferrule FerrulePanelPanelArea of materialthat moves intogrooveMounting holeDie sideof panelMaterialthicknessPunch sideof panelPanelThis area of material has separated from the rest of the panelCorrect installation Over installationounting holediameterPanel %u00d8 Min. Centerline of mounting holeRolloverFerrule FerrulePanellof materialmoves intoveDie sideof panelMaterialthicknessPunch sideof panelPanelThis area of material has separated from the rest of the panel
